Saturday, April 30, 2011

Another PTI Make It Monday #12 Post

Here is my third Make It Monday #12 Card.  For this one i decided to color on Kraft paper.  This was my first time coloring on Kraft paper.  I like the result.

I did realize today that I need to clean my Copic pen lids and my nibs.  I got some sticky deposits on my image's face that make it impossible to blend.  Suzanne Dean told me how to clean them when i took her On The Road classes two weeks ago.  Fill a bin with some alcohol, toss in the lids, swish them around then use a qtip (if you want) to get in the lids.  Once the lids dry, put them back on.  She also said I can quickly dip the nips in alcohol and then wipe with a "wipe" to clean off the ickyness.  I should be able to do this a few times before i have to replace the nibs. I do plan on coloring another one of these images in the same manner, but will wait until my pens are clean. From coloring on Kraft, I've determined that using colors that end in 0 or 1 pretty much make the paper look greyish....so avoid those.

The image I used is Laundry from The Greeting Farm (TGF).  I have a few images, digital and rubber, from TGF.  You will be seeing more :)  The sentiment is from the PTI set On My Couch.

Here is what i did.....  You can see on the right side of her face where my Copic started leaving stickiness. 

OMG!!!!.. I just realized those are slippers on her feet.  I was wondering why her feet looked funny.. LOL.  I'll get it right on the next card.
Supplies:
Paper: Vintage Cream (PTI), Kraft (PTI), Melon Mambo (PTI)
Stamps: Laundry (The Greeting Farm),On My Couch (PTI)
Ink: Tuxedo Black (Memento)
Other: Black Slick Writer (American Crafts), Copics

PaperTreyInk Make It Monday #12

The Make It Monday Challenge for this week is drawing line frames. For this challenge I made 3 cards.  Two of them are pretty much the same.  I kept the cards simple.

For the first 2, I used the large tree in Through the Trees from PaperTrey Ink.  I love this tree stamp.  I then added the sentiment in Woodland Friends from A Muse Studio.   For both cards, I stamped the tree in  Grass and French Roast, also from A Muse Studio.  I stamped the sentiment in Tuxedo Black (Memento) on the first card and in French Roast on the other.


Supplies:
Card 1
Paper: Stampers Select (PTI), Kraft (PTI)
Stamps: Through the Trees (PTI), Woodland Friends (a|s)
Ink: French Roast (a|s), Grass (a|s), Tuxedo Black (Memento)
Other: Black Slick Writer (American Crafts)

Card 2
Paper: Stampers Select (PTI), Grass (a|s)
Stamps: Through the Trees (PTI), Woodland Friends (a|s)
Ink: French Roast (a|s), Grass (a|s)
Other: Sepia Writing Pen (Martha Stewart)

Color Me Creative Copic Challenge: Pastels

This is my first Color Me Creative Copic Challenge. The challenge this round is to use Copics to color pastels. This was "challenging". :) It was very easy to fall back into the norm of having color everywhere. Trying to leave more white space requires more effort. I will need to practice this more. What I like about the CMC challenges is that they will get me to use Copics in a manner outside of my norm.

This is the card when I submitted it for the challenge.

I thought it needed more so I reworked it. I added some grounding, Shimmerz to the wings and glitter with my Spica.  Since i didn't have matching cardstock, I made my own with strips of white paper and my Copics.  I still have some more practice to do for the hair, but overall I like it better now.


Anyone know what the stamp image is?

Supplies:
Paper: Stampers Select (PTI), French Roast (a|s), Animal Crackers (Making Memories)
Stamps: ???? I don't know image, Essential Sentiments (a|s)
Other: Copics (BG01, BG05, R85, R83, R81, C00, C1, C2, C3, E00, E11, E21, Clear Spica), Angel Wings (Shimmerz),

Wednesday, April 27, 2011

CMC Beginner/Intermediate Class Review

Many of you know from my previous posts that I took Suzanne Deans On The Road Color Me Creative Classes.  These classes are a great way to get some hands on face to face instruction with Suzanne.  I have really enjoyed her free You Tube videos but nothing compares to having the one on one interaction.  She  individually looked at our work and provided individual feedback for each technique.  She would even jump in with a marker to show us what we needed to do, if needed.  I highly recommend the classes.  I have not taken any of her online Copic classes (yet) so I cannot offer a comparison.  I do plan on taking some of her online classes as well.  Suzanne stated that completing both of her On The Road classes gets you about half way through the techniques covered in her Online Copic 2 class.  Based on the Online class descriptions and what we actually did in class, I’d say we also touched on techniques in the Copic 3 class.

The class description below is taken from her class website followed by my review.  Visit CMC Road website here for more details, class schedule and availability.
 

Beginner/Intermediate Class
You will learn how to get comfortable with the markers, learn light sourcing, shading
and highlighting along with other practical techniques to bring your coloring to life!
*briefly learn about the basics of Copics and how they work/tips & tricks
*get comfortable with the markers and laying down color lightly
**Learn how to "f-l-i-c-k" layer/blend colors
*choosing successful color combos and layer colors
*learn about light sources and how to create dimension in your coloring
*shading and highlighting techniques (light & shadow)
*creating good skin tone and hair colors
*shading round objects
*coloring white
*Bridging Colors
*multi-liner pens & Spica pens
*Colorless Blender Techniques/Review
*Blues, Pinks, Browns, Yellows

My Review
At first I wasn’t sure if I needed to take the Beginner/Intermediate class.  I had never classified myself as a beginner or advanced user.  I am just a Copic user.  I had taken a couple classes at my local LSSs (I’m fortunate to have multiple LSSs).  I had seen many of Suzanne videos from a year ago.  I practiced off and on and was actually pleased with how I colored most my images. My method for coloring was similar to Suzanne’s “f-l-i-c-k” technique.   The reason I decided to take the Beg/Int class is because I wanted to improve my techniques for light sourcing, shading round objects and coloring and shading hair .  I tend to ALWAYS light source from the upper right.  I’m not sure why, because my desk light is on the left. My images also have very dull hair and not shiny, healthy, superstar hair.  Looking back at some of my images from class, I’m quite impressed with center light sourcing and my new hair techniques. 

At the beginning of the class she took some time to discuss the Copic baisic.  This part I already knew.  After that portion, there was never a time when I felt like I had made a wrong choice.   Once we picked up the markers we colored for the entire class with the exception of the 35 min break we had for lunch.  Throughout the class Suzanne provided tips, tricks and some of her latest color combos and findings.   In hindsight, the class was a must for me.  The class includes a step my step manual on the techniques we used in classes plus many more.

If I had to offer a suggestion for improvement, it would be to include at least one darker skin tone since I find the darker skin tones harder to blend.  Suzanne does have a You Tube video on coloring African American skin and hair.  I refer to it from time to time.  The technique is also covered in the manual from the class. 

Suzanne provided two types of paper for us to use: Cryogen White and Copic XPress.  The Cryogen white has a subtle iridescent finish so it sparkles.  This is my new favorite paper for Copics.  I will be ordering this.  The Copic XPress paper worked well too.  It just doesn't give that nice sparkle that the Cryogen does.

We colored many different images. Since I know many of you want to see some of the images i did, here are a few of my favorites. 
This is the first image we did with center lighting.  I really like this light source.  You can see from my image that I still have some practicing.  That bun....oh my.  The Copics and I were not seeing eye to eye on that bun.  I have some extra images of her so I'm going to find a way to fix that bun and still use her.  

 This is another center light source.  I need to rework her hair in the back because I don't like how the edges turned out.  A great thing about Copics is that I can continue work on this image even though it has been over a week since I last worked on it.

 In this image you can see the shimmer that the Cryogen white paper gives. 

For this bear I was trying to show him as white by giving him some shading and adding some background color.  I plan to go back and give him more shading contrast. 

I hope my review was helpful.  Suzanne's class was beneficial to me.  If you want to improve your Copic skills, consider checking out her online or on the road classes. 

I'll be back to post my review of the advanced class.

Sunday, April 17, 2011

Amazing Time with Suzanne Dean

Wow!!!  That's the word to describe the Copic classes I took today with Suzanne Dean.  She was at Inspiration Station in Stafford Springs, CT for her Color Me Creative on the road classes.  She is a great teacher with a wonderful personality and sense of humor.  Going into the class I was pretty comfortable with the images I would select to color.  Of course many of the images Suzanne selected were outside of my comfort zone.  This was good.  We did glass, metal, black hair, fur, pleats, PLEATS, pleats...did i say pleats.  The pleats were definitely the most difficult for me.   Some of my images looked like i colored them while i was in the car on a cobblestone road with one eye open and one arm tied behind my back.  In the end, i learned a lot of new techniques and added many things to the list of "things I need to practice, practice, practice"....like pleats and apparently fur too (based on the comments from my husband when I got home).

Of all the techniques, i most enjoyed coloring glass (surprisingly) and the different hair color combos and styles.  You will definitely see some new techniques in upcoming cards.  Until today, I had never done center lighting on my images.  I have to admit that I really like it and will be doing it more often. 

So I know you want to see pics of my work.  As beautiful as it is (LOL), that will have to come later in the week.  I'm exhausted.  I have work to complete for tomorrow and we still haven't done our taxes. 

Since I can't post more tonight, I will leave you with a pic of Suzanne and me.  It isn't a great picture of me but the picture isn't about me....it's about Suzanne.
Thanks Suzanne for coming and providing me with a wonderful opportunity.  In the future, I will definitely be heading over to the Color Me Creative Classroom to take some additional Copic classes.  You Rock!!  Thanks to Inspiration Station for hosting this.

It's a Copic Day

Everything I need for my all day Copic class is just about ready.  I still need to pack some snacks, lunch and dinner since it will be an all day affair.

Before heading off I want to share two the first stamps I ever colored with Copics.  This is another image from Mo Manning except I have it i an Acrylic stamp from Stampavie.  It is called 'Sumpins Wrong'.

At the time i started with Copics, I did not have any paper to use.  I did have some Neenah panel cards that I had bought a few years earlier for my son's baptism invitation.  i gave them a try and liked the results.

 In the one on the left I did some grounding.  I really does make a difference.


Enjoy.  I'll be back later to update you on my Copic class with Suzanne Dean.  Off to Inspiration Station.

Friday, April 15, 2011

Copic Class LIVE with Suzanne Dean

Guess where I will be this Sunday...taking two Copic classes with Suzanne Dean.  She is heading to Inspiration Station in Stafford Springs, CT for her next stop on her Color Me Creative Copic Classroom on the road series.

I'm very excited.  I LOVE coloring with Copics and really want to improve my technique.  I feel that i especially need improvement on grounding objects so they don't float in space.  I'm usually reluctant to attempt since i fear I will mess up all the work I did coloring the image.  Of course I could always cut out the image if I screw up (which is what i end up doing).   Cutting it out is faster than starting over. 

I'll be back on Sunday to update you on the classes.  Since I'm taking both classes, I'll be immersed in Copics from 9am to 7:30pm.  How fun!!!!!

Tuesday, April 12, 2011

Birthday Boy

I have two boys and the majority of my friends' kids are boys.  So you can guess that most of my cards are masculine.  I think it is more my style so it works for me.  Here is the last Mo's Digital Pencil image of this posting session.  This one if Kareem's Balloons.  This image is one of the first images I purchased. I've made a few cards with this one and never seem to tire of it. It is such a great image for a young boy card.  There will be many more of these in my future.  I already have a second image colored and ready to go.  I plan to challenge myself on the next image I color to use colors I haven't used before.

Supplies:
Paper: Stampers Select (PTI), Pure Poppy (PTI), Orange (a|s))
Stamps: So Happy For You (SU!)
Ink: Tuxedo Black (Memento)
Other: Copics, Black Hemp (CTMH)

PaperTreyInk Make it Monday #10

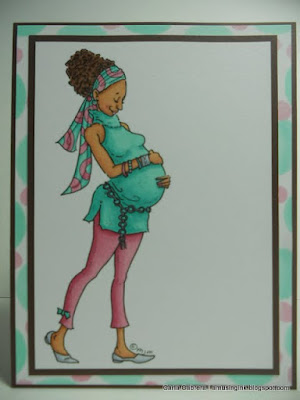
The Make It Monday challenge for this week is Masking with Dies.  The intention of this was probably to use stamp ink to color the image.  However, when i was coloring my image, I didn't have in mind any particular ink color.  I just picked colors I liked. Of course when I was done, I had no ink to match.  I decided to use the die mask and color it in using my Copics.  My die mask came from the top die from Banner Borders.  I used the negative to create the large circles and the center of the positive image for the smaller circles.

The image I used today is from Mo's Digital Pencil.  I've had this image for a number of months and am finally using it.  I think it is a beautiful image.  It brings back memories.  I colored it using Copics.

There is no sentiment because I don't have one that i felt worked.  If you have any sentiment suggestions, please let me know.
Since I was in the coloring mood and love the image, I also did a second card.  Although, this one does not fit the challenge.  Again...no sentiment.  Leave a comment if you have a sentiment suggestion.


Supplies:
Card 1
Paper: Stampers Select (PTI), French Roast (a|s))
Stamps: Mother To Be 2 (Mo's Digital Pencil)
Other: Copics, Border Builder (PTI, for the border mask)

Card 2
Paper: Stampers Select (PTI), Enchanted Evening (PTI), Orange (a|s))
Stamps: Mother To Be 2 (Mo's Digital Pencil)
Other: Copics

Mojo Monday 186

The focal of my MOJO186 card is an image from Mo's Digital Pencil.  I love the images from Maurie J. Manning at Mo's Digital Pencil.  I colored in the image with Copics. Since this is a masculine card, I used twine in both locations instead of ribbon as shown in the sketch and eliminated the scallops.


Supplies:
Paper: Stampers Select (PTI), Smokey Shadow (PTI), Orange Zest (PTI) and Papaya (a|s))
Stamps: The Big Guy Golfing (Mo's Digital Pencil), Swingin' Day (a|s)
Ink: Smokey Shadow (PTI)
Other: Copics, Cherry Twine (a|s)

Mo's Digital Pencil

I came across Mo's Digital Pencil last year right after finding Copics.  I love her images and that she does both straight hair and curly hair images.  Given that I'm a curly girly with curly head boys, I truly appreciate it.

Last week I didn't post any cards.  Instead I was working on coloring some images from Mo's Digital Pencil, specifically Mother to Be 2 , The Big Guy Golfing and Kareem's Balloons.  So day I have 3 posts.  One for each of the images.  Check them out.

Wednesday, April 6, 2011

$99 Starter Kit Special

Interested in joining the A Muse Studio Family?

For a limited time, you can get get the A Muse Studio Starter Kit for just $99.
A Muse Studio carries an exciting lineup of new, exclusive products with the quality you've come to expect from us. Rubber stamps are still the cornerstone of our product line; they're now available in cling mount sets and come in a handy DVD-style case for easy storage. We also have a beautiful line of custom printed papers, a brand new line of color-coordinated ink pads, satin ribbons, custom dies, impression plates, and so much more.  


To join, visit my website and select "Join our team" or "Start a Business".  If prompted, enter my consultant number 1069.

I would love for you to be part of my team.


For questions, please email me at AmusingInk@gmail.com.

And the Winner is...

Congratulations to Suzi.

She has won my Blog Candy Prize Pack.  I will contact her so I can get her goodies in the mail.

Thank you to everyone who visited my blog over the weekend.  I hope you return to see what I'm up to here in Amusing Ink Land.

If you have any feedback on ways to improve my blog please leave a comment.  I would love the feedback.

Saturday, April 2, 2011

Welcome to a|s Consultant Blog Hop

If you are participating in the blog hop, you should have come from Gena's Blog.  If you did not come from Gena's blog and are participating in the blog hop, you should start from the beginning with Kania's Blog until you come to my blog.

This is my first blog hop so I'm rather excited. I've put together three cards using A Muse Studio (a|s) products.  The lighting could use some improvement.  I plan to take the pictures again tomorrow in natural light and will then update this post.

My first card uses stamps from Tool-rific stamp set.  I used Papaya as the base cardstock.  I just love this color.  I then double matted the stamped images with Ocean and Grass cardstock.  For the images I alternated orientation and color of the wrench.  I decided to make one of the wrenches a different color to tie in the Papaya color.


My second card is a design from a|s that is provided to get us consultants "ready to roll" when we first get our starter kit.  Red is one of my favorite colors to use in papercrafting.  It just pops.  For this card I stamped the shirt image from the Brief Notes stamp set.   I colored the tie with my R29 Lipstick Red Copic Marker.  To get the stripes I used the Copic Blender pen and drew lines.  The blender pen pushes the color away to create stripes. I outlined the shirt with BG10 Cool Shadow Copic Marker.  I then mounted it on a strip of Sky cardstock and then onto Cherry cardstock.


My third card uses stamps from Rock Star and Mad for Plaids stamp sets.  This picture really does not do justice to the card.  

Thanks for visiting my blog.  I am offering some blog candy to one lucky commenter on my blog.
Blog Candy
Prize pack includes Assorted paper flowers (approx 25), Sakura glue pen, a|s diamond glitter and 3 A2 size card bases (cut and scored).

All you need to do is leave a comment on this post about my blog or this post.  Thanks for visiting.

Continue this great hop with your next stop at Kelly's Blog.

Supplies:
Card 1
Paper: Sugar, Ocean, Green and Papaya (a|s)
Stamps: Tool-rific (a|s)
Ink: Ocean, Green and Papaya (a|s), Tuxedo Black (Memento)

Card 2
Paper: Cherry and Sky (a|s), Stampers Select (PTI)
Stamps: Brief Notes (a|s), Contemporary Greetings (a|s)
Ink: Tuxedo Black (Memento)
Other: Copic R29, BG10, Colorless blender and Multi liner

Card 3

Paper: Ocean, Sugar, Sky (a|s)
Stamps: Rock Star and Mad for Plaids (a|s)
Ink: Ocean, Sky and Bubblegum (a|s)
Other: Ribbon (a|s)